Spicy Zucchini Pasta Arrabbiata with a Ton of Goat Cheese

I’m here to hyperbolize today. For one, zucchini is not pasta. For two, this is not a homemade arrabbiata sauce. For three, this isn’t a literal ton of goat cheese- more like 1.5 ounces. Whatever. It’s not hyperbole to say that the American summer drowns the population in zucchini. And when zucchini are 89 cents at the grocery store, or you have a sweet, farm-fresh zucchini hook-up, you start getting creative with recipes. Zucchini pasta is actually definitely not new for the Internet. I’ve seen a few recipes here and there, and I always imagined a mushy-textured bland delivery vessel for watery sauce. I just wasn’t that interested, I guess. But I have a bunch of zucchini, and I saw this recipe for a shaved summer squash salad. “That looks good,” I thought. And then I thought about blanching the zucchini, because do I even like it raw? And then things snowballed. I was adding Sriracha to my bowl and cooling off with a ton of goat cheese and freaking out about how I was going to blog about this dinner thisveryminute. And, check it out, I totally am. That’s right, I finished this meal 30 minutes ago, and I’m so pleased with it I have to write about it right now.

This dinner takes approximately 5 minutes to make, sets you back pretty much negative calories (cheese doesn’t count on top of vegetables), boasts nutrition stats like a Flintstone vitamin, and, yes, is incredibly delicious. It probably should be served with something substantial- some protein or something- just because alone it really is a bowl of vegetables. I’m not sure of the staying power, is what I’m saying. Anyways, when it’s too hot to cook in your apartment, and you’re overloaded with zucchini, and you just want a nice dinner that’s healthy and is something new, try this. Or, even, disregard all of that. Just try it.

Processed with VSCOcam with f2 preset

Spicy Zucchini Pasta Arrabbiata with a Ton of Goat Cheese

Serves 1 

1 zucchini, sliced thinly with a vegetable peeler

1/2 cup of green beans, rinsed and trimmed

1/4 cup Trader Joe’s Red Pepper Spread with Eggplant and Garlic

2 tsp. Sriracha

1/2 tsp. smoked paprika

1/4 tsp. salt

1/8 tsp. freshly cracked black pepper

1/8 tsp. cayenne pepper

Dash red chili flake

1 – 1.5 ounces goat cheese, crumbled

Processed with VSCOcam with f2 preset

Processed with VSCOcam with f2 preset

Heat a pot of salted water to boiling.

In a bowl (I used my serving bowl), mix the red pepper and eggplant spread (Trader Joe’s has an awesome one) with the Sriracha and spices. Set aside.

Slice your zucchini into threads with a vegetable peeler (it doesn’t take that long- I promise. Alternatively, you could use a spiralizer if you have one. That’s cool). Rinse, trim, and chop your green beans into acceptable-sized pieces. Add the green beans to the boiling water. 2 minutes later, add the zucchini. Blanch for 3 minutes. Drain the green beans and zucchini through a strainer.

Add the zucchini pasta and green beans to the sauce. Stir to coat. Crumble a ton of goat cheese all over the top. Enjoy!

Summer Squash and Potato Gratin

I’m mostly settled into my new apartment after an incredibly effortful weekend of plans and rearrangements and finishing touches. I’m actually sore, which is really embarrassing, and speaks to my otherwise level of inactivity for the past few weeks. My grandparents were here this weekend to help me finalize some things, namely things involving a drill and furniture building. And excitingly, my grandma, in her perfectly grandmotherly ways, brought me an entire picnic basket of fresh vegetables from her and her brothers’ gardens. Squash, zucchini, potatoes, green beans, beautiful tomatoes all rested comfortably together, simply begging for some preparation and timely enjoyment.

On Saturday night, around 7pm, in a hunger-driven panic between Ikea trips and unloading of said Ikea trips and putting together of said Ikea products, I scarfed down half a slice of leftover pizza and a few cookies my grandma had also brought me. I ate said dinner in approximately 3 minutes, while refilling my silverware drawer, and, following this ingestion, realized I thankfully was no longer hungry, so I went upon my way. As things go, my house became a swarm of cardboard and cellophane before becoming marginally more cohesive. Around 11pm I fainted onto my (thankfully) put together daybed, recognized that I was famished, ate some Pringles leftover from last weekend’s bachlorette party, and went to bed.  Needless to say, my first “meals” in this apartment have not been very notable. Or admirable. Or even really food.

Today, I eased into the morning with a nice walk, some reading, coffee, and breakfast. A leisure I haven’t taken in way, way too long. Afternoon involved some more apartment work for a few hours, followed by some cleaning, but today I was going to be put together. Or, at least not eat Pringles for dinner. The vegetables stared at me, quietly reminding me that produce is really only “fresh” for so long. I whipped up a zucchini bread during afternoon projects, which turned out deliciously. However, I for the second time witnessed my oven cooking at clearly far too low a temperature, for while the bread was cooked through to the tip of the toothpick I stabbed it with, a quarter inch of batter-becoming-bread thwarted my product. In plans for dinner, I questioned that I was using the oven again at all. Completely archaic, without a clock, timer, or evidence that digital technology had actually been established at the time of its construction, I could indeed verify it lit and made the oven warm, but I could not know at all at which temperature it was cooking. Given this was my third attempt, I ramped up the temperature even further above recommendation, and, amazingly, dinner turned out beautifully. (Also idiotic, I spent at least 2 hours of today with the oven on, in summer, in an apartment without air conditioning. I’ve been lightly sweating (or profusely so) for 48 hours).

Processed with VSCOcam with f2 preset

Breakfast of my dreams: toast with garden tomatoes and over easy eggs, side of French press coffee

So, what did I make? Well, to use in a timely fashion the bountiful summer produce my grandma had provided, I found a recipe for a gratin comprised of summer squash and potatoes. I figured adding a few extra squash would only improve upon the product, and I followed the recipe nearly exactly, exchanging some of the methods here and there to suit my new kitchen. I had no intention of blogging about the final result, because I was moderately convinced I’d retrieve from the oven a soggy, undercooked mess of vegetables. But, as you can clearly tell, it was a huge success! These pictures don’t do justice to the absolute delicious nature of this dish. I already plan to serve this at Thanksgiving, bring it to book club, and somehow offer it to everyone I know. Really. And, better, everything in here is peak-season-perfect. Please, please make this (mom, it’s right up your alley). And for any goat cheese haters (you’re absurd), you could substitute another cheese if you wish.

Processed with VSCOcam with f2 preset

Processed with VSCOcam with f2 preset


Summer Squash and Potato Gratin

Adapted from this recipe

Serves 6… I guess (serves me tops 4 times)

2 medium zucchini

2 medium yellow crookneck squash

1 medium yellow squash

3 medium red potatoes

4 tbsp. olive oil

2 tsp. salt

2 tsp. freshly-cracked pepper

1 tsp. dried thyme

4 oz. goat cheese

1/3 cup milk, anything but skim

1/3 cup grated Parmesan cheese

Preheat your oven to 400 degrees Fahrenheit (or 425 if you have an ancient oven).

Wash and dry your vegetables thorougly. Start by slicing the potatoes very thinly, about 1/4 – 1/8 inch thickness, taking time to make sure the slices are even. Add the sliced potatoes to a pot of salted water (I add about a 1/2 teaspoon). Bring the water to a boil and boil the potatoes for about 2 minutes, so that they are still firm. Drain the potatoes and add to a large bowl.

Continue slicing the remaining squash (you can use any combination of varieties; this is just what I had on hand) into thin, 1/4 – 1/8 inch thin slices. If you have a mandolin, that’d be great (I don’t). Add the sliced vegetables to the same large bowl. Pour 4 tbsp. olive oil over the vegetables as well as the salt, pepper, and thyme. Gently toss the vegetables to coat (some may break apart a bit, which is fine).

Lightly grease a large, 9 x 13 baking dish with olive oil, and add 1/3 of the vegetable mixture to the dish. Crumble half the goat cheese over the bottom layer of vegetables. Add another 1/3 of the mixture, and, again, top with the remaining goat cheese. Add the final layer of vegetables. Pour the milk evenly over the entire mixture. Sprinkle the top of the vegetables with Parmesan. Cover the dish with aluminum foil and place in the oven.

Bake the dish at 400 degrees Fahrenheit covered for 30-35 minutes. Afterwards, remove the foil and increase the temperature to 425 degrees Fahrenheit. Bake for an additional 10-15 minutes, until the Parmesan cheese top is bubbling and brown. Remove from the oven to cool slightly.

To serve, slice out a portion of the gratin (it slices fairly easily, although will slide around some). Sprinkle torn or chiffonade basil over the top. Wait 2 minutes so you don’t burn your mouth, then dig in.

Longest post ever. Worth it.

Pineapple Teriyaki Shrimp

This is my 52nd post for this blog. I didn’t realize the 50th was the 50th, and also missed noting the 51st, so here: I’m calling out my 52nd. My posting frequency has slowed some since the beginning, in part due to an exhausted schedule, in part due to more nights out on warm evenings. I have all of these things I wish to spotlight, and I keep pushing back recipes thinking they’ll be more fitting for another time. But I intend to keep this going, even if slowly, in expectation that with time I blog all I have to share. I am kind of curious if eventually I’ll run out of ideas, like maybe the 203rd post, and have to stop. Or does taste and experience change enough to keep a continuous fodder for this small, insignificant space? Maybe it’s more likely I run out of steam before I run out of ideas. Who’s to say.

I’m also very nearly approaching the time at which I can no longer say “From a Chicago Kitchen,” which makes me sad. I doubt I’ll change it; I’ll just take the route most Suburbanites take, who say they’re Chicagoans in a greater-Chicago perspective. I hope whatever kitchen I have next has good lighting.

Anyways, this recipe is a great one, I think, for the beginnings of summer. I probably prepared it a few weeks ago now, so I’d expect pineapples would be even more ripe and delicious. I admit I didn’t make my own Teriyaki sauce- I’ve never had a very comprehensive Asian pantry to make things from scratch on a whim- but I certainly didn’t just toss the shrimp with something out of a bottle. There were a few bottles involved! I also ran out of Sriracha (the most terrible of crimes), but I’m including it in the recipe because of course it should be included.

Processed with VSCOcam with f2 preset

Processed with VSCOcam with f2 preset

Processed with VSCOcam with f2 preset

Pineapple Teriyaki Shrimp

Serves 4

1 lb. raw shrimp, peeled and deveined

1 pineapple, prepared and chopped into 1 inch. cubes (about half of the fruit needed)

1 red bell pepper, roughly chopped

1 cup brown rice + 2 1/4 cups water

1/2 + 1/4 cup Teriyaki sauce, divided

1/4 cup low-sodium soy sauce

1/4 cup water

1 tbsp. Sriracha

1 tbsp. corn starch

1 tbsp. coconut oil

Dash red chili flake

Prepare the shrimp and toss with 1/2 cup pineapple cubes and 1/2 cup Teriyaki sauce. Allow to marinade for 15-20 minutes.

Cook the brown rice according to package directions, usually 1 cup of brown rice to 2 1/4 cups water, cooked for about 30 minutes. Fluff and set aside.

Using a blender, mix together about 1/2 cup of pineapple cubes, 1/4 cup Teriyaki sauce, 1/4 cup soy sauce, 1/4 cup water, corn starch, and Sriracha. Blend until the pineapple is completely pureed into the mixture. Set aside.

In a large wok or non-stick skillet, melt coconut oil over medium high heat. Add the marinated shrimp (pineapple included), red bell pepper, and an additional 1 cup of chopped pineapple.  Cook the shrimp for about 3-4 minutes per side, until they are opaque. Once the shrimp is cooked and pineapple warm, pour the Teriyaki pineapple sauce over the shrimp. Stir frequently until the sauce coats the shrimp and thickens, about 2-3 minutes.

Serve rice and pineapple Teriyaki shrimp alongside each other. Be cautious with seasoning the rice- there is enough salt in the sauce without any additional salt added. Top with additional Sriracha as desired (you should always desire more Sriracha) and enjoy!

Asparagus and Roasted Tomato Egg Yolk Pasta

Memorial day weekend is one of the best of the year. It’s the time to embark upon any and all summer adventures. The pools open for visitors, the beaches start to fill, grills everywhere are lighted, and the brightening green grasses and trees are appreciated to their fullest extent. There is almost nothing in the world that makes me happier than seeing my dog Oscar bound with excitement on his first steps through the park’s green grass. Memorial day weekend screams, loudly, “SUMMER IS COMING!” And, oh my God, how incredibly ready we are. If you haven’t yet eaten ice cream, drank minimum one beer outside, or at least felt the fresh contact of sunshine, please, please drop what you are doing and enjoy. But, of course, if you’re in for the night, or maybe laying exhausted on the couch, meal planning for the week ahead (which promises nothing as fantastic as the weekend has held), here’s a delightful, summer inspired recipe to try.

If you freak out about egg yolk being added uncooked to the pasta, you can always skip it. However, it cooks lightly from the heat of the pasta and the pan, and it adds a creamy richness unparalleled by just butter or pasta alone. I don’t know about you, but there’s basically nothing better than a runny egg yolk dripping over vegetables, and that’s exactly what my intention was here. It kind of mimics pasta carbonara in this fashion, which has been eaten by indulgent Italians for years, so there’s really nothing to fear.

Processed with VSCOcam with f2 preset

Processed with VSCOcam with f2 preset

Asparagus and Roasted Tomato Egg Yolk Pasta

Serves 2

4 oz. buckwheat or whole wheat pasta (something long and noodley)

2 tbsp. extra virgin olive oil

10-12 spears asparagus, trimmed

2 cups heirloom grape tomatoes

1/2 tsp. dried red pepper flake

Salt & pepper, to taste

1 egg yolk

1/3 cup Parmesan cheese, freshly shredded

Bring a large pot of salted water to a boil.

In a deep sauté pan over medium high heat, add the olive oil. Add the asparagus and tomato to the pan and sauté until the asparagus has softened and the tomatoes have started to blister open, about 10-15 minutes. Season with red chili flake, salt, and pepper.

Add the pasta to the salted boiling water and cook according to package directions, pulling from the water about 30 seconds to 1 minute “early” (buckwheat pasta takes about 3-4 minutes to cook, so watch carefully). Drain and add to the roasted vegetables. Remove the sauté pan from the heat.

Add the egg yolk to the pasta and toss until evenly coating the pasta and vegetables. I find tongs to be the easiest tool to use. Add the Parmesan cheese and toss again. Taste and season with additional salt and pepper as preferred.

As you can see, this comes together quite quickly. Definitely under 20 minutes. So indulge, enjoy, and relish in the impending delight that is summertime.


Processed with VSCOcam with f2 preset

Hot and Cheesy Stuffed Mushrooms

Oh, yeah. If you’re going to describe something as hot and cheesy, you’re probably not referencing mushrooms. You’re probably drooling over some mac ‘n’ cheese, or a pizza straight from the oven, or even a cheeseburger hot off the grill. Mushrooms are little fungi that have no clout with the hot and cheesy comfort foods of America. Not to say they don’t have their place- mushrooms can totally top that pizza or cheeseburger or even swim along side the melted cheese in your pasta. People respect them; they’re just not really that excited. But stuffed mushrooms deserve their place among the dinner parties and maybe even BBQs of your future. They’re poppable and flavorful and oh-so-endearing. The stuffing components have expansive, varied potential, but this recipe comes together in seriously 16 minutes and is a great place to start. I, in fact, invented this recipe on one of those I-haven’t-shopped-in-2-weeks-what-now kind of evenings, so you won’t find fresh herbs or obscure components this time. Not that they wouldn’t be delicious… but let’s keep things simple for now.

I used little button mushrooms for this recipe, because they’re what I always buy at the grocery store- they’re super versatile. But if you wanted a more substantial mushroom, you could easily up the ante by using adult creminis, which are portobellos (gasp!). I personally enjoy the ratio of filling to mushroom here, and also believe the diminutive size of these snacks to be a positive rather than an annoyance. To speak further to the possibilities here, you can of course adjust the amount of hot sauce you add to these to heat things up even more. Wow; it’s getting hot in here. All this mushroom talk… Just wait ’til you hear the compliments coming your way when you bring these to that block party next week.

Processed with VSCOcam with f2 preset

Processed with VSCOcam with f2 preset

Processed with VSCOcam with f2 preset


Hot and Cheesy Stuffed Mushrooms

Serves 2 (or multiply for limitless servings)

10 baby cremini mushrooms, rinsed and de-stemmed

1/4 cup hummus (I used original, but play around with the flavors)

2 tbsp. Parmesan cheese, freshly grated

2 tsp. hot sauce

1/4 tsp. smoked paprika

1/8 tsp. cayenne pepper

1 tsp. bread crumbs, optional

Preheat the oven to 375 degrees Fahrenheit. Prepare the mushrooms by rinsing and gently removing the stem (save for stock or toss it). In a small bowl, stir together the hummus, Parmesan, hot sauce, and spices until well blended. To easily fill the mushrooms, add the filling to a zip top bag and push into one corner. Snip the corner to make a 1/4 inch opening. Squeeze the filling into the mushrooms (about 1/2 tbsp. per mushroom). You may have a bit left over, depending on how much you add. Feel free to overflow these a bit; they’ll stay stable in the oven. Top the stuffed mushrooms with a sprinkle of bread crumbs.

Bake the mushrooms in the oven for 12-15 minutes, until golden and juuuuust starting to release their juices. Remove from the oven, cool slightly, and serve.

These are an awesome quick dinner, a great appetizer, a perfect pot-luck accompaniment, and just an all-around good time. So easy, so good; you should certainly multiply this by about 10.

Spring Onion and Thyme Chicken Salad

I last made this chicken salad, I think, over 4 years ago at my apartment in Durham. My mom and Brian were over and were hungry. I whipped this up pretty quickly for an easy dinner, and then it was promptly devoured with pita bread dippers and even a spoon. Chicken salad is so easy, yet so delicious, it’s interesting that I should go several years without making it. What’s important, though, is that Brian loved it (loves it? who knows). This chicken salad involves poaching the chicken, which seems, on first glance, to be the least flavorful way of cooking chicken there is. However, poaching the chicken in a flavorful stock with fresh herbs and vegetables actually ensures the most moist, juicy chicken ever. And once tossed with the other salad ingredients, this truly becomes a decadent lunch- or dinner-time food.

Processed with VSCOcam with f2 preset

Processed with VSCOcam with f2 preset

Spring Onion and Thyme Chicken Salad

2 chicken breasts poached

  • 2 boneless, skinless chicken breasts (about 3/4 – 1 lb.)
  • 4 cups chicken stock
  • 6 sprigs fresh thyme
  • 1 carrot, roughly chopped
  • 1/2 yellow onion, quartered

1/2 cup mayonnaise, light or otherwise

Zest and juice of 1 lemon

1/2 green apple, diced finely

1/4 yellow onion, diced finely

4 spring onions, diced

2-3 tbsp. fresh chives, minced

2-3 tbsp. fresh thyme (several sprigs)

Salt & pepper, to taste

To prepare the poached chicken, add all ingredients to a sauce pan, including the stock. Bring the mixture just to a boil, then lower the heat to very low and cover. Poach for about 15 minutes (depending on the size of the chicken breasts) until the chicken is tender to touch. Remove the poaching liquid from the heat, and allow the chicken to cool in the liquid for 10-20 minutes. Remove the chicken from the liquid and chop roughly. Strain the liquid and store as stock for a later date! (It keeps well in the freezer).

Mix together the chicken salad ingredients and serve, over a spring salad with cucumber or in a pita pocket or on a slice of bread. This keeps well in the refrigerator for several days.


Processed with VSCOcam with f2 preset

Gnocchi with Balsamic Reduction and Garlic Kale

Ah! It’s been a whole week, and I haven’t had one moment to talk about dinner. Sunny, warmed up, Spring- and Summer-time Chicago is a demanding experience. People are always doing everything, preferably outdoors, at any and all hours, and yes, of course, you should go also. You should take your dogs on epic 2-hour walks down the lakefront, stopping to sprint and roll and tackle in the middle of dandelion-spotted verdant grass inherent only to the Midwest in late Spring. You should stare longingly at Lake Michigan, willing it with your mind to be warmer, knowing that regardless you can’t really swim in that bacteria-laden pool. You should run outside, in the morning, afternoon, or night, relishing the angles of the sun on the skyline and the dusted rooftops as the sun sets. You should certainly eat tacos on the sidewalks, with at least one margarita on the side. And yes, absolutely enjoy a happy hour flight down the street. You can feel the depths of winter siphoning out of your veins, and you can almost, almost forget it happened (maybe not this year entirely). But on those rare nights in, probably on Wednesday, you still need to eat dinner.

Gnocchi is responsible for the best meal of my life, hands down. Traveling Florence with my best friend way-too-many years ago, we stopped for lunch at a small restaurant off the main streets. We had a carafe of water and a glass of wine; I ordered gnocchi with tomato cream sauce and she ravioli. I’m certain she enjoyed her meal immensely, but I will never ever forget the pillowy, unbelievably cloud-like texture of the gnocchi I had that day. The tomato cream sauce was light but flavorful, just enough to coat the little dumplings of joy. I haven’t tried homemade gnocchi (yet), so returning to the US I’ve been accepting but somewhat disappointed in the gnocchi offerings. It doesn’t stop me from enjoying this Italian classic, but I should definitely try my hand at my own version.

Regardless, this gnocchi is really most about the accompaniments. The gnocchi is still, of course, soft and flavorful, but the balsamic reduction and vegetables and kale are perfect for an almost-summer dinner that still warms you up. It’s absurdly easy, also, so don’t let the word “reduction” fool you. It really just means “heat for awhile then serve.”

Processed with VSCOcam with f2 preset

Processed with VSCOcam with f2 preset

Gnocchi with Balsamic Reduction and Garlic Kale

Serves 3-4

1 lb. gnocchi

1 cup balsamic vinegar

2 tbsp. olive oil, divided

1 yellow onion, diced

1 red bell pepper, diced

1 cup mushrooms, sliced

6 cups kale, washed and chopped

4 cloves garlic, minced

1/4 tsp. dried red pepper flake

1/4 cup fresh basil leaves, sliced thinly (chiffonade)

Salt & pepper, to taste

In a small sauce pan, heat the balsamic vinegar over medium-high heat until boiling. Reduce the heat to medium-low and allow to simmer, stirring occasionally, until reduced by half. It should be reduced in about 10 minutes. Remove from the heat and set aside.

Bring a large pot of water, salted, to boil.

In a large pan, heat 1 tbsp. olive oil over medium heat. Add the onion and peppers and sauté until just softening, about 5 minutes. Add the sliced mushrooms and cook until the mushrooms have softened, browned, and just releasing their juices. Season with salt and pepper.

While the vegetables are cooking, in a separate pan add 1 tbsp. olive oil over medium heat. Add the minced garlic and sauté until fragrant, about 30 seconds. Add the kale and stir. Cook the kale until just softening, about 5 minutes. Add salt, pepper, and red pepper flake to the kale and stir.

In the large pot of water, add the gnocchi and cook for about 3 minutes, or according to package directions.

Add the balsamic reduction to the vegetables and mix. Once the gnocchi has cooked, add the gnocchi to the pan as well. Stir thoroughly so all of the gnocchi and vegetables are coated.

To your serving plate, add a serving of garlic kale. Top with the balsamic-coated gnocchi and vegetables. Enjoy.


Processed with VSCOcam with f2 preset

Glazed Tofu Banh Mi

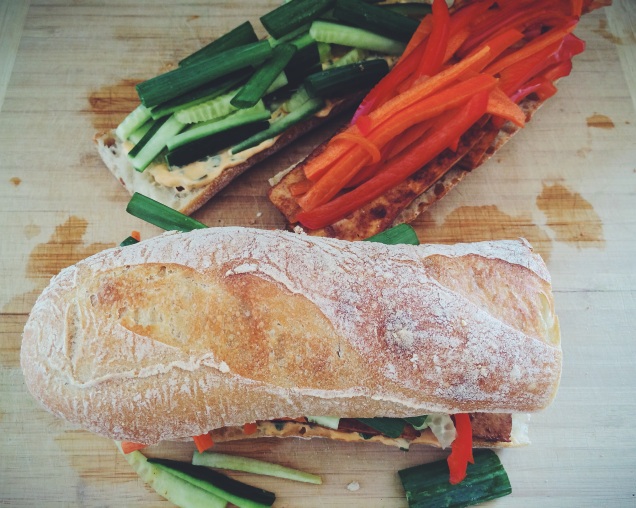
When you’re living in a big city, you without intention are exposed to new ideas and cultures and references on an almost daily basis (depending on how much you go outside). One of the fantastic things about Chicago is its diversity, and the fact that the variability in culture penetrates even the most “gentrified” neighborhoods. Because even though I live in a high-rise full of more-often-than-not wealthy-ish older white people, I’m also steps from 4 Asian fusion, 1 upscale Mexican, 1 classic American, 1 Swedish brunch, 3 chain, and countless other restaurants. One of these includes a Vietnamese sandwich shop, known most for their banh mi sandwich. I coincidentally lived very near a Vietnamese sandwich place last year as well, so I’ve essentially passed by this delicious delicacy on an almost daily occasion for 2 years now. I don’t know why, but I’ll say it: I’ve never had a classic banh mi sandwich. Cue shame.

Now, in actuality, banh mi refers to a type of bread, not a specific sandwich. But in the westernized United States, it almost always refers to a baguette-type sandwich with roasted pork, pickled vegetables, chili sauce and/or mayonnaise, and cilantro. Variations come off of this base model, usually exchanging the pork for other meats or, in this case, vegetarian soy products (tofu!). Basically, this sandwich is a dream of beautifully combined products that promise to sooth and challenge all parts of your palate. But, probably, you’ve been passing it by, either literally or figuratively, without knowledge of its potential power over your sandwich cravings. I’m here to remedy that problem, by offering up a means to make this sandwich at home. I promise it is worth the (marginal) trouble to prepare each component, as it really takes about 45 minutes of time and is worth every second of the 2 minutes you’ll spend wolfing it down. Again, this is a tofu variety, which is quite easy to prepare, but you could certainly go traditional by preparing some pork or chicken (the same marinade can apply).

Processed with VSCOcam with f2 preset

Processed with VSCOcam with f2 preset

Processed with VSCOcam with f2 preset

Glazed Tofu Banh Mi

Makes 4 sandwiches

2 small baguettes (I used take and bake varieties, which freeze well)

1 cucumber, sliced

4 stalks green onion, sliced

Cilantro, chopped

Glazed tofu:

  • 1 block extra firm tofu
  • 1/2 cup soy sauce
  • 1/2 tsp. ground ginger
  • 1/4 tsp. cayenne pepper
  • 1/4 tsp. red pepper flake
  • 1/4 tsp. smoked paprika

Pickled vegetables

  • 5 small carrots, julienned
  • 1 bell pepper, sliced thinly
  • 1/2 cup rice wine vinegar
  • 3 tbsp. sugar
  • 1/4 cup water
  • 1/4 tsp. salt
  • 1/4 tsp. freshly cracked black pepper

Sriracha cilantro mayonnaise

  • 2 tbsp. mayonnaise
  • 1 tsp. sriracha
  • 2 tbsp. cilantro, chopped

First, press the block of tofu (per this post) for at least 20 minutes. Once the tofu has been pressed, slice the tofu thinly into 16, 1/4 inch slices (or, slice into quarters, then slice each quarter into 4 slices). Whisk together the tofu marinade, then dip each slice of tofu into the marinade and allow to marinate in a large pan for 15-20 minutes.

While the tofu is pressing, prepare the pickled vegetables. Thinly slice, or julienne, the carrots and bell pepper and place in a dish (ideally that can be covered for later). Bring the rice wine vinegar, water, sugar, and S&P to a boil, until sugar has dissolved in the liquid. Pour the pickling liquid over the vegetables and allow to rest in the liquid for at least 30 minutes. You can store the remaining vegetables in the pickling liquid for several days (if these sandwiches will be prepared as “leftovers” as well later… a good idea).

Next, prepare the sriracha cilantro mayonnaise by combining the ingredients in a small bowl and mixing well. Refrigerate until ready to use.

Next, heat a griddle to 375 degrees Fahrenheit or a large sauté pan over medium heat. Add 1 tbsp. oil and the tofu to the pan (if using a sauté pan, this may require two batches). Heat the tofu for 3-5 minutes, until the first side is crisped and brown. Flip, then sauté the second side for an additional 3 minutes. Remove from the pan and set aside.

Now, time to prepare the sandwich! Split the baguette in half and then slice longitudinally to make 2 sandwiches. Spread about 1 tbsp. of sriracha cilantro mayo on one side. Top with 4 slices of glazed tofu. Pile on as much of the pickled veggies as you’d like, then top with fresh cucumber, green onion, and cilantro.

Eat the sandwich! Bits will certainly fall off as you eat, but relish in your unstable sandwich, should-be-take-out glory. I absolutely loved these sandwiches for lunch the next day, prepared the night before then eaten cold. Once all the components are prepared, it’s quite quick to put together. I’d imagine if you used meat you could just hold onto some extras for leftover sandwiches as well. Now I’m off to try the sandwich shop next door, just to compare…


Processed with VSCOcam with f2 preset

Inverted Shepherd’s Pie

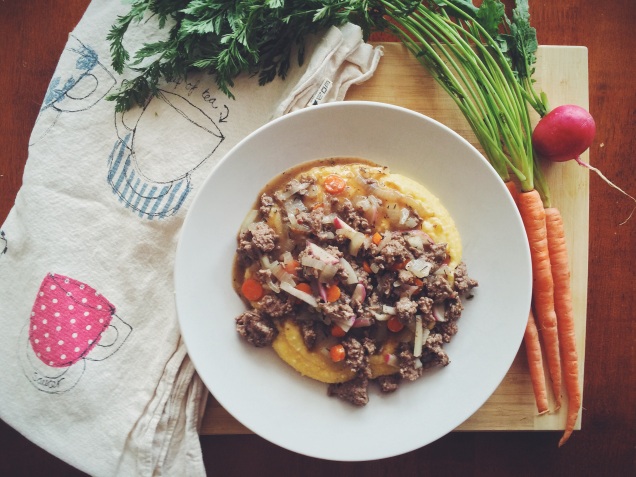
Or something. Sorry, that’s the closest thing I could come to for a “title” of this dinner. It’s delicious, though? I mean, in a sense, it’s very similar to shepherd’s pie… minus the potatoes, plus some polenta, minus a few veggies, plus a few veggies, served from the stove-top, not baked… it works, I think. In any case, it tastes delicious. It actually reminds me nearly as much of my grandma’s classic creation: hamburger gravy. It sounds kind of gross, to strangers anyways, and actually is ground beef over potatoes (pretty similar to shepherd’s pie as well!), but it was a midwestern classic in a too-many-children household. Ground beef, sautéed with onions, tossed with flour and milk, served over creamy mashed potatoes and corn- it’s definitely comfort food. And no one makes it as well as my grandma, because that’s the kind of food that has to be served by an older relative. Kind of like Bisquick pancakes, some things are just better coming out of grandma’s kitchen. Not to be limited by flour and water, my grandma actually has a great variety of things she loves to cook, and we eat all of it heartily and happily. I’m not sure I’ve ever seen her make polenta, though, so from here we diverge.

I think it’s probably obvious now that I am loving polenta. It’s creamy, it’s warm, it’s got just enough flavor to really amplify its corresponding ingredients (rather than just sitting there mashed on the plate), and it’s easy to prepare. I bought probably 2 cups a month or two ago, and it’s gone now, which is saying something for me. Usually I buy bulk grains and use them slowly, in a random pattern, until they’re finally exhausted months later. I suppose I just tire of the same thing too many times in a row. Polenta, though; it’s working for me right now. I guess I need to buy more.

But beyond the polenta, the ground beef in this recipe is really a great accompaniment. With some diced spring vegetables, it’s hearty yet flavorful and fresh. It feels awkward preparing dishes with ground beef, I realized as I thought of what I wanted to do with it besides make a hamburger. It always looks a bit unappetizing in its plain form, and it’s hard not to smother it in sauce and call it a day. Ground beef always seems to be a component of a dish, rather than a main ingredient (excusing said burger). It really doesn’t need too much though, I believe. A few veggies serve the purpose of diversity on the palate, and a hearty starch creates immediate comfort food, regardless of the recipe. Don’t let the pictures deceive you; this tastes more than what it looks.

Processed with VSCOcam with f2 preset

Processed with VSCOcam with f2 preset

Inverted Shepherd’s Pie (I guess)

Serves 4

1 cup polenta

3 cups chicken stock

1 cup milk

2 tbsp. butter

1 lb. grass-fed ground beef

4 spring carrots, diced

4 radishes, sliced into slivers

1/2 yellow onion, diced

1 tbsp. olive oil

2 tsp. thyme

1/4 tsp. dried red chili flake

Salt and pepper to taste

1 tbsp. corn starch

1/2 cup chicken or vegetable stock

2 tbsp. soy sauce

First, prepare the polenta. Bring 3 cups of stock and 1 cup milk, whisked, to a boil. Once boiling, add the polenta to the pot while whisking constantly. Continue to whisk until the polenta is suspended in the liquid, ever so slightly thickened. Reduce the heat to low, cover, and cook for about 30-45 minutes, until the liquid is fully absorbed. Whisk every few minutes initially, then stir occasionally with a wooden spoon, making sure to scrape the bottom of the pan. As noted before, the polenta may be “done” a bit earlier, but cooking longer yields deeper flavor. Once cooked, add 2 tbsp. of butter, and salt and pepper to taste, and stir into the polenta. Keep covered and set aside.

Heat 1 tbsp. olive oil in a large sauté pan over medium heat. Cook the carrots and onions until they’re just softened and the onions are translucent, about 5-8 minutes. Add the radishes and stir. Add the ground beef to the pan and cook until browned, about 10 minutes. Add the thyme, chili flake, and salt and pepper to taste and stir. In a mason jar, add the corn starch, 1/2 cup of stock, and soy sauce. Shake to combine. (Alternatively, whisk in a bowl). Pour the thickened stock over the meat and vegetables and bring to a boil. Let the stock reduce until thick and adherent to the meat and veggies. Remove from the heat.

Plate a serving of polenta and top with the meat and vegetable mixture. Something about carrots and radishes makes it feel French to me somehow, with an obvious Italian (polenta) influence. Maybe it’s just European. Maybe it’s a mish-mash. Either way: it’s good.


Processed with VSCOcam with f2 preset

Spotlight On: Tofu

Per the request of some readers (eh hem, mom), I wanted to start sharing ingredients I routinely use while cooking. Where to buy them, how to prepare them, good recipes to start with… etc. I thought the most appropriate ingredient to discuss was tofu, notably because I’ve used it for two recipes in the past week, but also because it’s probably my most frequent source of protein. I love tofu, and I think it gets a seriously bad rap as an easily-dismissed “vegetarian” food, that has no use outside of replacing steak or chicken. While vegetarians certainly flock to tofu as a substitute, it’s also a delicious, substantial, and, yes, flavorful ingredient on its own. While I probably eat vegetarian most of the time, I most nights prefer tofu to other options, simply for its adaptability, cost, and quick cooking time.

But, what exactly is tofu? Tofu is really coagulated soy bean curd (I guess you could almost compared it to a really pressed yogurt, to compare soy milk to cow’s milk), which, I know, sounds so appetizing. The soy curd is pressed firmly into a block shape, usually; however, there are many varieties of tofu that alter the consistency and flavor of the final result. One major difference to note is between silken tofu and firm tofu. Silken tofu is not pressed or drained, and thus has a very high moisture content. It’s best applied to dessert recipes, or can be used as a substitute/ almost thickening agent in pies and shakes and all sorts of vegan treats. I’ve never even bought silken tofu (although I’d like to try it), and you should probably bypass it if you’re looking to make a dinner recipe. Firm tofu, by comparison, is pressed. It is usually sold as firm or extra firm tofu, although I from time to time have seen “medium” varieties. Considering most recipes call for pressing the tofu further prior to applying marinades, I see the most value in buying the lowest moisture content variety- extra firm tofu. Extra firm tofu is easily pressed into a dense, sliceable, formed block that absorbs marinade incredibly well and stays together nicely when tossing in a pan. If trying tofu for the first time, I’d go with this variety, as it (in my opinion) has the best texture after cooking. While I could in theory go on for days about tofu and its varying components and varieties, I’m going to direct you to wikipedia if you want more information.

Processed with VSCOcam with f2 preset

My favorite place to buy tofu is Trader Joe’s. This is probably because Trader Joe’s is my favorite grocery store for price and varied (and interesting!) ingredients, but I love their extra firm tofu as well as their sprouted extra firm tofu (I especially love that the sprouted tofu comes divided in half, thus creating single serving sizes for this lonely dinner-eater). Tofu is available at nearly every grocery store now, usually located near the dairy section, and always labeled “extra firm” or whatever type it is. I can’t differentiate much between brands, so go for whichever suits your fancy. Usually tofu comes in 4-5 servings, which I think is laughable because I nearly always eat half a block at a time. As a single serving, it’s much less caloric than chicken or any red meat. If doubled up, it’s about comparable calorie-wise. (Of note, this Trader Joe’s brand is a bit more calorie-dense than most other brands).

And in case you’re interested, here’s a calorie and protein comparison:

1/4 block tofu: 9g protein, 80 calories

1/2 block tofu: 18g protein, 160 calories

4 oz. (1/4 lb.) chicken breast: 13g protein, 120 calories

3 oz. ground beef (85% lean): 16g protein, 180 calories

As I’ve prepared tofu time and time again, I have definitely come across my favorite cooking methods. I’ll share a few here, but my absolute, hands-down favorite is pan-fried/ sautéed tofu cubes. When prepared correctly, the tofu is delightfully crisp with a soft interior, perfectly dippable and easily combined in rice dishes of varying ethnic influences, stir fries, salads, and more.

How To: Pressing Tofu

Pressing tofu releases excess moisture from the block, dehydrating the tofu further and thus making it extra thirsty for marinades. Pressing also improves the texture, allowing for a more toothsome, chewy yet smooth inside. I personally enjoy the flavor of tofu plain; however, if using a marinade, apply it immediately after pressing.

Processed with VSCOcam with f2 preset

Processed with VSCOcam with f2 preset


  1. Remove tofu from packaging and drain off excess water
  2. Place a hefty pile (about 3 sheets) of paper towels onto a sturdy surface
  3. Place the tofu on top of the towels
  4. Top with another hefty pile of paper towels
  5. Top with another sturdy, flat surface, such as a small cookie sheet or baking pan
  6. Weigh down the tofu with light pressure, using a small can other 1-2 lb. item
  7. Keep compressed for 30 minutes
  8. Ready to prepare and use!

How To: Perfectly Pan-fried Tofu

This is my favorite way to prepare tofu, and really very easy. If you’re somewhat impatient, this may be tedious, as it involves flipping to every side of the tofu cube (yes, 5 times). However, it really does cook quickly, and if preparing the rest of your dinner at the same time, you’ll barely notice the process. If marinating, cube the tofu and marinate prior to cooking, then sauté directly from the marinade.

Processed with VSCOcam with f2 preset

Processed with VSCOcam with f2 preset


  1. Cube tofu into blocks (if not already done)
  2. Heat a sauté pan or griddle over medium high heat (or 400 degrees Fahrenheit)
  3. Lightly oil the pan with grapeseed or other high-heat oil
  4. Place the tofu down evenly on the pan- I like to space them into rows so I can easily keep track of flipping
  5. Allow to cook for 2-3 minutes per side (the first side may take a bit longer as the pan is still warming)
  6. I usually flip by turning towards me, towards me again, and towards me once more to get all 4 “middle” sides. I then flip all of them to the right, then flip it 180 degrees/ twice over to get the last raw side. Again, it’s easier if you just keep them all lined up. Alternatively, you could just toss frequently, although the sides will not be evenly browned.
  7. Season with salt, pepper, and other spices as desire and serve, either plain to dip or with your recipe of choice.

How To: Other Tofu Preparations

I’ve tried a few other methods for preparing tofu, and these are notable standouts (although not winners):

Baked Tofu:

  1. Preheat the oven to 375 degrees Fahrenheit
  2. Cube tofu, or, if already marinaded, remove from marinade. If not marinated, toss with 1 tbsp. oil
  3. Place evenly on a baking sheet
  4. Bake for 20-30 minutes, flipping once 180 degrees halfway through baking, until golden brown

This yields a pretty similar product to pan-fried tofu, so, if you’d rather be more hands-free, this may be a better option. I find the final product to be a bit more chewy and lacking in that truly crispy exterior, so if eating plain or in a dish in which tofu is highlighted, I’d spend the extra time with the sauté pan.

Broiled Tofu:

  1. Turn on the broiler
  2. Slice tofu into 1/4 inch slices and marinate… or not. If not, coat lightly with oil
  3. Place the tofu on a baking sheet lined with parchment paper
  4. Broil for 5-6 minutes, until golden brown, then flip
  5. Broil for another 3-5 minutes, until the opposite side is browned to your liking
  6. Serve

Broiled tofu is quick, and does yield that good, crispy exterior. You lose the creamy middle, and I find it much less flavorful unless marinated because of that. It does make good dippers, though.

Sofritas:

See this recipe!

And finally, in case you want to enjoy your pan-fried tofu, and try out an easy recipe, here’s a delicious way to enjoy them, simply with a bit of Mexican flair.

Tofu Lettuce Wraps with Avocado Cream

Serves 2

Processed with VSCOcam with f2 preset


Processed with VSCOcam with f2 preset


1 block extra firm tofu, pressed

1 tbsp. oil

8 romaine leaves

1 avocado

1/4 cup Greek yogurt

1/4 tsp. garlic powder

1/4 tsp. salt

1/8 tsp. freshly cracked black pepper

Cholula chili pepper sauce

Prepare the pan-fried tofu as directed above. Mix together the avocado, greek yogurt, and seasoning into a smooth cream. Place a dollop of avocado cream on the lettuce leaf and top with 3-4 tofu cubes. Top with just a few drops of chili sauce and enjoy.

I hope something here encourages you to give tofu a try. Any and all questions or helpful facts are welcome!