Thai Dumpling Kale Salad

It may be a week until Christmas, but I’m already kind of done with the cookies. Maybe it’s because everyone’s Christmas parties start back into the beginning of December, or maybe it’s because I joined some friends in a cookie-baking-bonanza that resulted in a whole tin of cookies to myself. I kind of don’t want at all mashed potatoes or stuffing or ham or holiday comfort food. I’ve been jamming on avocados and goat cheese, and I got into my mind that I could really go for an Asian salad. You know the kind, the Americanized version with ginger and wontons.

Well, of course, I didn’t have the ingredients for the giant salad of my imagination (which mirrored that of California Pizza Kitchen fairly precisely), but I did recognize I had a bunch of kale, a threatening-to-die carrot, and maybe some impromptu dressing ingredients. Out of a basic pantry and sad representation of a refrigerator… I created the best dinner I have had in months.

No, really. Admittedly, I freaking love the dumplings from Trader Joe’s. I used to buy the pork gyoza all the time, but somehow hadn’t in awhile… maybe it was a grad school thing. But I don’t eat pork or pigs anymore, and the frozen isle caught my eye (I’ve been excessively lazy recently). I saw Thai gyoza and thought I’d give it a try. The dumplings, while absolutely important, sit atop a salad so flavorful and balanced, that the whole (giant) bowl just satisfies every salty, tangy, savory craving you didn’t even know you had. I was not at all a believer in kale salads; I usually sauté my kale or put it in soups (read: why I had kale in the first place… soup season). But by massaging in the dressing, the kale becomes perfectly crunchy with just the right bite to offset the soft, fluffy little dumplings. I must say, the fresh ginger makes it. Which I totally would not have had if Thanksgiving had not been so recent, but please buy some if you’re making this salad tomorrow (as you should).

And, so long as you have this, or just a normal bottle of Sriracha, you are totally ready to go.

Processed with VSCOcam with f2 preset Processed with VSCOcam with f2 preset

Thai Dumpling Kale Salad

Serves 1 hungry person (per usual); easily multiplied

Thai Peanut Dressing

½ tbsp. canola (or other mild-flavored) oil

½ tbsp. tamari or soy sauce

1 tsp. natural peanut butter (peanuts and salt)

1 tsp brown sugar

½ tsp. sriracha

2 inch ginger knob, peeled and grated finely, juice included, stringy remnants discarded

Dash crushed red pepper flake

Salad and Dumplings

2 cups organic curly kale, chopped finely

1 golden carrot, peeled and minced/ chopped finely

½ tbsp. canola oil

5 Thai vegetable (or shrimp) gyoza/ dumplings (from Trader Joe’s)

2 tbsp. roasted and salted peanuts

Sriracha to serve

In a large serving bowl, whisk together the dressing ingredients. Add the kale and toss, with your hands, massaging the dressing into the kale leaves. Set aside while you prepare the remaining ingredients (time is your friend).

Use a food processor to finely chop the carrot (or your own determination and knife) and add to the greens. Toss.

In a small, non-stick sauté pan, prepare the gyoza according to package directions, which I’ll include here. Heat the oil over medium high heat and add the gyoza to the pan. Cook for 3-4 minutes until the bottom is browning. Add ¼ cup of water to the pan and quickly cover with a lid. Steam for 4-5 minutes until the gyoza are softened and cooked through.

Sprinkle the peanuts over the top of the salad and place the gyoza on top. Drizzle Sriracha over everything.

Absolutely dig in.

Processed with VSCOcam with f2 preset


Real question: should this blog be titled “Sriracha to serve”? Seems that’s at the end of every recipe. Also, I hate how dinner time in the winter means it’s pitch black outside. Try taking a good photo in your dark, poorly lit living room… sigh. At least dinner is good.

Gnocchi with Balsamic Reduction and Garlic Kale

Ah! It’s been a whole week, and I haven’t had one moment to talk about dinner. Sunny, warmed up, Spring- and Summer-time Chicago is a demanding experience. People are always doing everything, preferably outdoors, at any and all hours, and yes, of course, you should go also. You should take your dogs on epic 2-hour walks down the lakefront, stopping to sprint and roll and tackle in the middle of dandelion-spotted verdant grass inherent only to the Midwest in late Spring. You should stare longingly at Lake Michigan, willing it with your mind to be warmer, knowing that regardless you can’t really swim in that bacteria-laden pool. You should run outside, in the morning, afternoon, or night, relishing the angles of the sun on the skyline and the dusted rooftops as the sun sets. You should certainly eat tacos on the sidewalks, with at least one margarita on the side. And yes, absolutely enjoy a happy hour flight down the street. You can feel the depths of winter siphoning out of your veins, and you can almost, almost forget it happened (maybe not this year entirely). But on those rare nights in, probably on Wednesday, you still need to eat dinner.

Gnocchi is responsible for the best meal of my life, hands down. Traveling Florence with my best friend way-too-many years ago, we stopped for lunch at a small restaurant off the main streets. We had a carafe of water and a glass of wine; I ordered gnocchi with tomato cream sauce and she ravioli. I’m certain she enjoyed her meal immensely, but I will never ever forget the pillowy, unbelievably cloud-like texture of the gnocchi I had that day. The tomato cream sauce was light but flavorful, just enough to coat the little dumplings of joy. I haven’t tried homemade gnocchi (yet), so returning to the US I’ve been accepting but somewhat disappointed in the gnocchi offerings. It doesn’t stop me from enjoying this Italian classic, but I should definitely try my hand at my own version.

Regardless, this gnocchi is really most about the accompaniments. The gnocchi is still, of course, soft and flavorful, but the balsamic reduction and vegetables and kale are perfect for an almost-summer dinner that still warms you up. It’s absurdly easy, also, so don’t let the word “reduction” fool you. It really just means “heat for awhile then serve.”

Processed with VSCOcam with f2 preset

Processed with VSCOcam with f2 preset

Gnocchi with Balsamic Reduction and Garlic Kale

Serves 3-4

1 lb. gnocchi

1 cup balsamic vinegar

2 tbsp. olive oil, divided

1 yellow onion, diced

1 red bell pepper, diced

1 cup mushrooms, sliced

6 cups kale, washed and chopped

4 cloves garlic, minced

1/4 tsp. dried red pepper flake

1/4 cup fresh basil leaves, sliced thinly (chiffonade)

Salt & pepper, to taste

In a small sauce pan, heat the balsamic vinegar over medium-high heat until boiling. Reduce the heat to medium-low and allow to simmer, stirring occasionally, until reduced by half. It should be reduced in about 10 minutes. Remove from the heat and set aside.

Bring a large pot of water, salted, to boil.

In a large pan, heat 1 tbsp. olive oil over medium heat. Add the onion and peppers and sauté until just softening, about 5 minutes. Add the sliced mushrooms and cook until the mushrooms have softened, browned, and just releasing their juices. Season with salt and pepper.

While the vegetables are cooking, in a separate pan add 1 tbsp. olive oil over medium heat. Add the minced garlic and sauté until fragrant, about 30 seconds. Add the kale and stir. Cook the kale until just softening, about 5 minutes. Add salt, pepper, and red pepper flake to the kale and stir.

In the large pot of water, add the gnocchi and cook for about 3 minutes, or according to package directions.

Add the balsamic reduction to the vegetables and mix. Once the gnocchi has cooked, add the gnocchi to the pan as well. Stir thoroughly so all of the gnocchi and vegetables are coated.

To your serving plate, add a serving of garlic kale. Top with the balsamic-coated gnocchi and vegetables. Enjoy.


Processed with VSCOcam with f2 preset

Tomato and Basil Wrap with Goat Cheese

I’m considering moving from Chicago to be closer to work. And by considering I mean looking at rental properties and planning the timeline of my summer around the move. I’ve had emotions ranging from excitement (to leave behind a bad commute) to apathy to an “everything will be about the same” attitude to outright sadness. And now that it’s getting closer, the latter is the overwhelming opinion. It’s probably because the trees are green now and the sun comes out. And that the streets are starting to burst open with people and the skyline is sparkling again. It’s probably something to do with the extra time the sunlight allots my day and the ease and freedom I have in calling up friends to meet for dinner. I’m a little unsure if I’ve allowed something so transient as a job to remove me from this beautiful city that is the reason I moved back to the midwest. And then I’m certain that people in their 20s are supposed to move for work because those are the sacrifices you make to be successful. But maybe-I-don’t-want-to-be-successful-I-just-want-to-eat-dinner-outside-on-the-sidewalks. Who finances that lifestyle?

So here’s a really delicious wrap that you can make for lunch the night before to bring to work. It feels pertinent to discuss things like that as I toss and turn with thoughts and expectations for work, life, and otherwise. Because the question: what should I bring for lunch tomorrow? persists despite all life events. It is the permanent question at 9:39pm when you wanted to go to bed 10 minutes ago. It is important because it’s food that will fuel your day, but so absurdly insignificant because it’s that midday meal that’s satisfied by leftovers or snacks or cafeteria food or random fridge grabs. No one really cares much about lunch. So here; change that.

Processed with VSCOcam with f2 preset

Processed with VSCOcam with f2 preset

Processed with VSCOcam with f2 preset

Processed with VSCOcam with f2 preset

Tomato and Basil Wrap with Goat Cheese

Serves 1

1 large flour tortilla, softened

2 tbsp. roasted garlic hummus

1 tbsp. goat cheese, crumbled

8-10 fresh basil leaves

1/4 cup baby spinach

5 heirloom cherry tomatoes, halved

Salt & pepper, to taste

To prepare the sandwich, I spread on a layer of hummus, followed by the goat cheese crumbles. Drop a few basil leaves and top with a small handful of baby spinach. Halve the tomatoes and stack precariously atop the greens. Sprinkle lightly with salt and pepper. Roll the wrap by tucking in both ends and rolling away from you. I usually wrap it up in a paper towel and aluminum foil to keep it contained.

This stays well overnight, probably even longer (I haven’t tried). A perfectly flavorful lunch wrap tangy from the goat cheese and creamy from the hummus, with just the right peppery basil bite and pop of fresh tomato. Serve with some fruit or Greek yogurt for a truly healthy lunch of champions. Pride yourself on your preparedness and commitment to not buying lunch from the cafeteria. High five.

And now, back to ponder the great questions of life.

Light and Lemony Tuna Salad

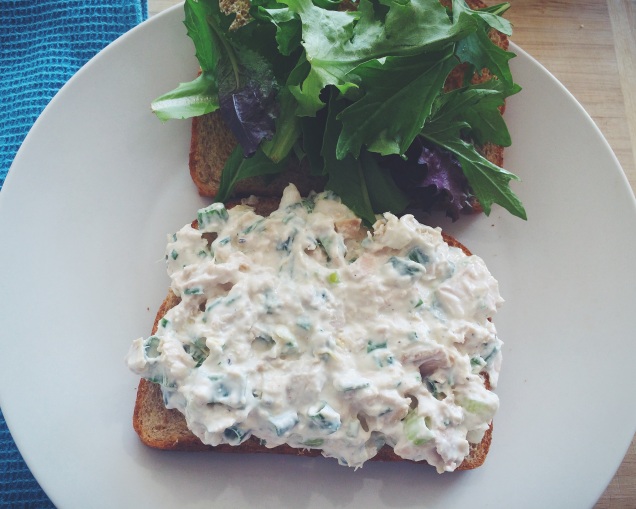
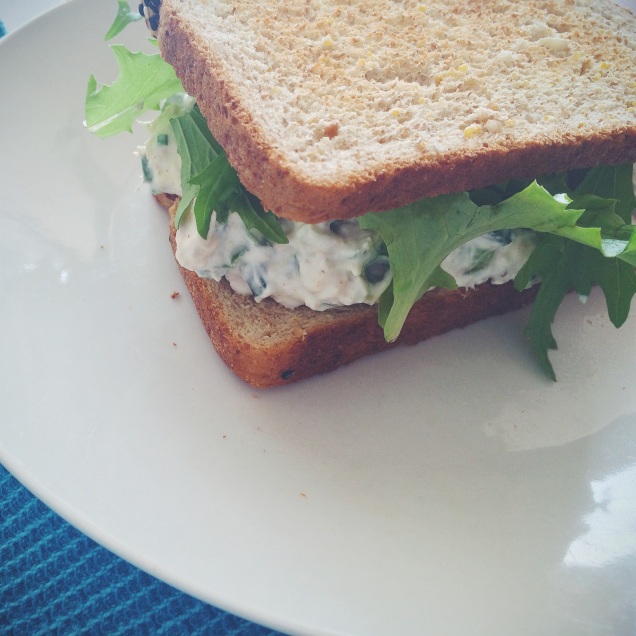
After long runs in the sunshine, or even just a delightful day outside, I find myself craving light, fresh, and bright-flavored foods. Little fish tacos with a margarita, or cucumber salad, or guacamole and super thin chips. Or, when you’re in a pinch, a quick and easy tuna salad. A can of tuna is a ubiquitous pantry member, yet it usually lies dormant on the shelf for months, until someone remembers it and either tosses it out or finally puts it to use. It’s definitely considered a back-up food, as most foods with long shelf-lives are, but it certainly warrants a bit more attention. Tuna salad can be heavy, rich, and, frankly, pretty gross if prepared poorly. Which is how I feel about it when I see it in a cafeteria. But by swapping some of the fat-laden components for more fresh ingredients, tuna salad can elevate to a truly delicious salad topper, dip, or sandwich.

There are pros and cons to tuna consumption, weighing on contrasting sides the mercury content and over-fishing against the nutritional benefits (when consumed in moderation). It can be considered a health food when eaten on a weekly to monthly basis, which, to be fair, it never is. The economical and moral impact of buying and eating tuna has more controversy, and you can follow-up with your documentary of choice. I always buy dolphin-safe, sustainable tuna, but that is admittedly pretty hard to find. Trader Joe’s and Whole Foods both have a good selection to choose from. Other choices range from albacore to white tuna to super white, packed in water or oil with or without salt. Go with whatever sounds good. I usually select albacore packed in water, lightly salted. But I love salt and buy everything with it, so take that as you will.

The best pairing, I think, to the slightly dense-tasting fish, is lemon and fresh greens. Lemon and herbs have the magic ability to freshen and lighten almost every food, and combined they almost transport you to the garden somehow. In Spring-time, of course. Herbs obviously have great variety of flavor, and alternating your choice here can give your lunch the diversity it needs, if you’re a tuna-salad-eater. But this combination I would say is pretty classic.

Processed with VSCOcam with f2 preset Processed with VSCOcam with f2 preset Processed with VSCOcam with f2 preset

Fresh and Lemony Tuna Salad

Serves 2

1 can albacore tuna packed in water

1/4 cup non-fat Greek yogurt (I love Fage)

1 tbsp. mayonnaise with olive oil (or mayonnaise of choice)

2 tbsp. minced chives

2 green onions, diced

1 lemon, zested

Dash of cayenne

Salt & pepper to taste

Drain the tuna thoroughly, then add to a small mixing bowl. Break up the tuna with a fork. Add the yogurt and mayonnaise and stir to combine. Add the chives, green onions, lemon zest, and seasonings. Stir to mix completely. Taste and adjust seasonings as necessary.

Serve the tuna salad over a bed of mixed greens, on a pita, on a sandwich, with crackers, in a wrap, or whatever way your head can dream up.

Spring Vegetable Quinoa Salad

It’s been warm for the past two days, which would be exciting if the weather channel didn’t have that 10-day-forecast of anxiety available. So while it broke 50 degrees (60 yesterday!) for three days in a row, I know it’s fleeting, with promises of colder, rainy weather later this week. I also had no opportunity to enjoy a spare minute of warmth with travel and working late, so I’m hardly feeling like Spring is around the corner. It’s nice wearing a different coat, though, and not freezing walking to my car. But, man, everybody is talking about the weather these days. Maybe because we’re all desperate for it to change. Onto other topics- salad. Vegetables in salad. Spring vegetables in salad. Because agreeable weather or not, it seems as though lighter, brighter vegetables are finally coming into season, and that is something to truly enjoy. My grocery list is now just a list of various vegetables, with Greek yogurt and eggs tacked on to the end. It’s my favorite. So I wanted to use these vegetables in a way that would truly spotlight them. Vegetables don’t need to be relegated to the side of the plate, shadowed by a hunk of meat and barely seasoned. They can and should be the center, the flavor of the dish! This salad is absolutely bursting with veggies, which may or may not seem natural to you, but it tastes so cohesive and delicious. Holding the asparagus, broccoli, and radishes together are the quinoa and a quick and easy lemon vinaigrette. I’ve been eating this for lunch all week (with a side of Greek yogurt- yum [by the way, some Bonne Maman jam swirled into Fage is the. best. snack/lunch side. ever.]).

Processed with VSCOcam with f2 preset

Processed with VSCOcam with f2 preset

Processed with VSCOcam with f2 preset

Spring Vegetable Quinoa Salad

Serves 4

1 cup quinoa, rinsed

2 cups chicken stock

2 stalks broccoli, chopped into small florets

12-15 asparagus spears, chopped into 1 inch segments

3-4 spring onions, chopped into 1 inch segments

4-5 radishes, sliced thinly into rounds

1 tbsp. extra virgin olive oil

1/4 cup chicken stock

Lemon vinaigrette

  • 2 tbsp. extra virgin olive oil
  • 2 tbsp. lemon juice (from 1 large lemon)
  • 2 tsp. honey
  • 1/4 tsp. salt
  • Dash of freshly cracked black pepper

Romaine lettuce, sliced/ chopped

Goat cheese, crumbled, to serve

Hard-boiled egg, diced/ crumbled, to serve

To prepare the quinoa, add to a hot pot over medium-high heat. Toast the quinoa for 3-5 minutes, stirring regularly, until lightly toasted and fragrant. Add 2 cups of chicken stock and bring to a boil. Once boiling, reduce the heat to low, cover, and cook until the liquid is fully absorbed, about 12-15 minutes. Stir to fluff and set aside.

Prepare the vegetables. In a large sautee pan over medium heat, add 1 tbsp. olive oil. Sautee the asparagus and broccoli until softening and lightly browning, about 5 minutes. Add 1/4 cup of chicken stock and allow to boil, steaming the vegetables. Continue to cook until the liquid has boiled off, about another 5-10 minutes. Set aside to cool slightly.

In a large mixing bowl, whisk together the lemon vinaigrette. Add the cooked broccoli and asparagus, as well as the radish rounds and spring onions. Mix to coat. Add the cooked quinoa and stir to combine. Season with additional salt and pepper if needed. Refrigerate for several hours or overnight.

To serve, add the chopped Romaine lettuce to a plate. Top with the spring vegetable quinoa salad. Sprinkle on goat cheese and/or a chopped hard-boiled egg for additional protein to round out the meal. Serve with a small side for a complete lunch.

Processed with VSCOcam with f2 preset

This isn’t exactly dinner, necessarily; but would be a great side or main lunch component. The lemony spring flavor and fresh, bright vegetables are so inviting with the nutty quinoa holding everything together. This is how I like to eat salad.

“Chipotle” Sofritas Salad Bowl

In a world without many Chick-fil-A restaurants, Chipotle is my go-to fast-food of choice. Besides the fact that you can almost achieve a “healthy” order if selective at the toppings bar, you can get your food topped with a mountain of guacamole. I nearly always order the vegetarian salad bowl, simply because it comes standard with a mountain of guacamole instead of requiring a surcharge. I appreciate that Chipotle does seem to research the sources of their meat and dairy, but I tend to order vegetarian at restaurants unless I know it’s from a good source. Recently, however, I noticed Chipotle had upped their vegetarian offerings: sofritas tofu as a flavorful “meat” option. I never had heard of sofritas previously, but I love tofu, and it looked enticingly spicy and delicious. The downside: guacamole was now an extra again. But no matter: I’m a gainfully employed member of society; I can spring for the extra topping. I ordered my usual bowl- lettuce, black beans, fajita vegetables, medium salsa, pico de gallo, little bit of cheese, huge glob of guacamole- but added the sofritas as well. The verdict was: delicious! The sofritas really imitates classic taco meat in texture and flavor, with just a hint of extra spice. I knew within a few bites I’d be recreating it at home.

The first time I made sofritas from a block of tofu, I topped it on a salad with a few toppings and called it a day. It was delicious, but I wanted to really imitate the Chipotle bowl, just to compare. So I set off to make it again… and it only took 3 months! But really, there are a lot of components to a Chipotle bowl, and to the point of not spending tons on groceries, I’ll admit I skipped over a few of my standard bowl toppings, knowing I wouldn’t miss it much. And, at the end of it all, I think the sofritas tofu is really spot on, the toppings a perfect combination, and… this is the kicker… no guacamole required. This was a definite mistake, as I for some reason didn’t buy enough limes, or have cilantro, or have enough garlic, to make my favorite guacamole. After pondering lame versions, I decided sliced avocado would have to do. Not the same, but certainly nothing to be mad about. Avocado in its truest form is pretty darn delicious as well. In total, this is totally something to check out, either at home or at your neighborhood speedy Mexican joint; it really would please vegetarians and meat-lovers alike.

Processed with VSCOcam with f2 preset

Processed with VSCOcam with f2 preset

Processed with VSCOcam with f2 preset

“Chipotle” Sofritas Salad Bowl

Serves 2-3

Sofritas

  • 1 block extra firm tofu, pressed for 30 minutes
  • 1 lime, juiced
  • 2 tbsp. grapeseed (or other neutral) oil
  • 3 cloves garlic, minced
  • 3/4 tsp. chili powder
  • 3/4 tsp. cumin
  • 1/4 tsp. cayenne pepper
  • 1/2 tsp. salt
  • 1/8 tsp. freshly cracked black pepper
  • pinch of dried red chili flake

1 red bell pepper, sliced thinly

1/2 yellow onion, sliced thinly into half-moons

1 tbsp. grapeseed oil, divided

1 cup black beans, tossed with 1/4 tsp. cumin and salt and pepper

1 avocado, sliced

1/2 cup shredded cheddar and/or monterey jack cheese

4 cups shredded romaine lettuce (about 1 1/2-2 romaine hearts)

Dressing of choice, if desired (I went without; strong considerations- chipotle ranch or spicy lime vinaigrette)

To prepare the sofritas, first press your block of tofu for at least 20-30 minutes. Once pressed, whisk together the juice, oil, garlic, and spices to create a marinade. Break up and crumble the tofu with your fingers into a small mixing bowl. Pour the marinade over the top and toss the tofu until evenly covered. Allow to marinade for 30 minutes to an hour (or until you want to make dinner). When ready to cook, heat a sauté pan over medium high heat and add 1/2 tbsp. grapeseed oil. Add the sofritas to the sauté pan and distribute evenly, allowing to cook without stirring for at least 5 minutes or so; this is to facilitate browning the tofu. Once beginning to brown, stir the sofritas and continue to cook until browned to your liking, about another 5-10 minutes. Taste and season as desired, and set aside to cool slightly.

In another sauté pan, heat 1/2 tbsp. grapeseed oil over medium heat. Add the bell pepper and onion and cook, stirring occasionally, until the vegetables have softened and browned, about 10 minutes. Set aside to cool slightly.

In the same sauté pan, heat the black beans until warm. Remove from heat and set aside.

To prepare the salad, plate the romaine. If using dressing, toss the romaine lightly with dressing before plating. Next, add the peppers and onions, then a pile of sofritas, then the black beans. Sprinkle 2 tbsp. – 1/4 cup of shredded cheese over the salad, then add the sliced avocado on top. Then take a fork to it and mess it all up so everything is evenly distributed. Dig in and enjoy!

This makes a pretty big salad- definitely a dinner salad. But it’s intention is to compete heartily with the Chipotle burrito, quesadillas, and tacos! It’s very satisfying, and you won’t miss out on the extra cheese, meat, and tortillas at all. (Of course, if you wanted to be really indulgent, you could add some tortilla crisps to the salad and just go all out).

Processed with VSCOcam with f2 preset

Processed with VSCOcam with f2 preset


How people actually eat salads… a mess of delicious ingredients, available at every bite.


Polenta with Rosemary Mushrooms

So, this meal looks remarkably similar to my shrimp and grits post from a few weeks ago. And, I guess in theory, that makes sense, because polenta and grits are remarkably similar. They are, in fact, the same food- corn meal- ground to varying consistencies. Polenta is usually a bit more coarse; however, traditionally, they are really derived from distinct types of corn. But when it comes to grocery store shopping, can you really find a difference? Not usually. The more coarse, deeply yellow corn meal I purchased (from the bulk bins at Whole Foods) is labeled “polenta,” and is what I’d consider polenta to be. Contrastingly, when I make grits, I use a finely ground white corn meal, which cooks quite a bit more quickly and yields a creamier consistency. These are lot of fancy descriptions for ground corn. The biggest difference notable to the consumer is 1) cook time and 2) texture. If you want dinner on the table in under 15 minutes, finely ground corn meal, usually grits, are the way to go. If you want more deeply developed flavors, go with something more coarse and simmer for awhile, usually polenta. However, this can probably be reversed. (I believe some Southerners would turn their nose at the finely-ground, more-quickly-cooked stuff).

I purchased the polenta on a whim, eager to see what the difference really tasted like. I also wanted a classic Italian flavor profile (two Italian dishes in a row!? Too bad I actually made this a couple weeks ago), so I topped the polenta with delicate and bitter greens and rich and savory mushrooms. I pretty much love mushrooms made this way. The rosemary isn’t overwhelming, but does add to the savory-ness (that’s a word now).

Processed with VSCOcam with f2 preset

Processed with VSCOcam with f2 preset

Polenta with Rosemary Mushrooms

Serves 1 (I eat alone… but this is easily multiplied)

1/4 cup coarse, stone-ground polenta

1 cup chicken stock

1/2 tbsp. butter

1 cup arugula

4 oz. cremini mushrooms, sliced

1/2 tbsp. butter

1/2 tbsp. flour

1/2 cup chicken stock

2 tbsp. fresh rosemary, chopped finely

Pinch dried red chili flake

Salt & pepper, to taste

To prepare the polenta, heat the chicken stock in a pot over medium-high heat until boiling. Once boiling, turn the heat to low, add the polenta, and whisk constantly, until the polenta has absorbed some of the stock and is thickened slightly. Cover the pot and simmer the polenta, stirring intermittently to avoid sticking to the pan. Cook the polenta for 30-40 minutes, until the liquid is fully absorbed and the polenta is creamy. It may seem “done” a bit before this, but cooking longer intensifies the flavor. Once finished, add butter and season with salt and pepper. Stir to incorporate and plate.

While the polenta is cooking, heat a sauté pan over medium heat. Add the butter to the pan and melt, then add the mushroom. Cook the mushrooms until browning and releasing their juices, about 5 minutes. Season the mushrooms with salt, pepper, and chili flake, and add the fresh rosemary. Mix to combine. Toss the flour over the mushrooms and stir to incorporate. Cook the flour over the mushrooms for about a minute, until the white powdery flour is no longer visible. Add the stock, which should bubble upon contact. Stir to incorporate the stock with the mushrooms, and allow the stock to thicken and reduce. Cook for about 3-5 minutes, until the liquid is quite thick and adherent to the mushrooms.

Top the plated polenta with a pile of greens. Add the hot rosemary mushrooms above the greens, which will cause them to wilt slightly and soften the flavor. Eat slowly and savor the deep corn flavor with the savory rosemary mushrooms.

I love grits, but polenta is seriously good.

Processed with VSCOcam with f2 preset

(Anyone notice my distorted reflection in the spoon of my first picture? Yes, these are iPhone photos. I love VSCOcam.)

Spicy Honey Soy Glazed Tofu Stir Fry

That title is a mouthful. And this dinner is a delicious mouthful! Easy puns. Tofu and vegetables, stir fried together in a sumptuous saucy glaze, are such a great, easy-yet-satisfying, healthy dinner. They don’t, however, photograph well. So while the images below may not entice you suddenly to purchase these ingredients and throw this together, I promise it’s actually one of the more delicious things I’ve made. The glaze is just the perfect combination of salty, sweet, and spicy, and the vegetables take to it perfectly, smothered yet crisp. I happen to love tofu, especially when pan fried, but I’m sure another protein would fit in this meal nicely as well. I thought about plating these components on a bed of rice, but, honestly, it’s really not necessary.

I loved this combination of vegetables because of their contrasting components, textures, and flavors, but, as a stir fry, substitutions are easy and not discouraged. Sometimes I think it’s fun just to browse the produce section and choose something different, which is why you won’t find snap peas or broccoli in this recipe. Whatever you want to try this week, whatever you’d like to experiment, pour this sauce over it and it’ll work out.

Processed with VSCOcam with f2 preset

Top left and clockwise: red pepper, bok choy, radish, carrots, cremini mushrooms


Processed with VSCOcam with f2 preset

Inside the mason jar: sauce that is amazing


Processed with VSCOcam with f2 preset

My favorite way to prepare tofu: lined up on a griddle, flip x 6


Processed with VSCOcam with f2 preset

Spicy Honey Soy Glazed Tofu Stir Fry

Serves 2-3

1 block extra firm tofu, pressed

2 tbsp. grapeseed (or other high heat) oil, divided

1/2 red bell pepper, diced

1 head bok choy, trimmed from the base and washed

5-6 medium radishes, sliced thinly

1-2 medium carrots, sliced into thin rounds

5 oz. cremini mushrooms, washed and sliced

Spicy Honey Soy Glaze:

  • 3 tbsp. soy sauce
  • 1 tbsp. grapeseed oil
  • 1 tbsp. honey
  • 1 tsp. sriracha
  • 1/4 tsp. black pepper
  • 1/4 tsp. ground ginger
  • Pinch of red chili flake
  • Dash of cayenne pepper
  • 2 tbsp. diced shallot
  • 1 tbsp. cornstarch

Before cooking, prepare all of your ingredients and have ready. To prepare the tofu, open it from its package, drain the excess water, and place on a plate covered with a few paper towels. Top with more paper towels and weigh the tofu with another plate or medium-weight kitchen object. Let press for 15-30 minutes. Dice the tofu into about 1 inch cubes, depending somewhat on the size of the block (mine ended up more rectangular). Chop all of the vegetables according to the ingredients list.

Add the glaze ingredients to a mason jar and shake vigorously to combine. Set aside for later use.

I prepare the tofu separately, so that I can easily brown each side (which I find difficult in a standard sauté pan). You definitely don’t have to be so regimented- you could just as well brown in a sauté pan until seared to your liking- but I like every side to be crispy. So, either in your largest sauté pan or on a griddle, over medium-high heat or heated to 375 respectively, heat 1 tbsp. oil and place the tofu cubes in rows. Allow to cook for 1-3 minutes per side (I find the pan heats up over time, whereas a griddle is more consistent) until a light to medium brown is achieved. Once to tofu is sautéed, set aside.

In the same large sauté pan, wok, or other pan, heat the remaining tbsp. of oil over high heat. Add the carrots and bell pepper and cook for 2-3 minutes, until just softening. Add the bok choy and cook for another 2 minutes, until the leaves are just beginning to wilt. Add the mushrooms to the pan and allow to brown, cooking just until the juices are releasing, about 3 minutes. Add the radishes and toss (I add at the end so they maintain some crispness). As the juices from the mushrooms boils off, add the tofu to the pan and mix. Lightly (lightly!) season with salt and pepper. Next, add the spicy honey soy glaze to the pan. It will bubble violently and thicken, so stir vigorously until all vegetables and tofu are coated evenly. Remove from heat and serve.


Processed with VSCOcam with f2 preset


And, as always, top with sriracha. It may not be the most beautiful, but this is better than take-out. Much, much healthier too.

Buffalo Quinoa Burgers

So this is a new experienxe, blogging on my phone from a coffee shop (my favorite- Ipsento in Bucktown). I forgot my iPad, so it’s especially inconvenient. But I have this Nutella Mocha here, and I’m not thinking it’s so bad. I made these burgers for the first time a few weeks ago, and actually made them as “bites,” which was directed according to the recipe I was following. They were absolutely delicious, served atop a bed of butter lettuce and other salad accoutrements (Is that possibly spelled correctly? Will spell check function appropriately on my phone?). However, these quinoa bites were kind of unproportionately inconvenient to prepare and make, requiring three rounds of pan sautéing and individual dips into buffalo sauce. I thought to myself: hey, this would be way easier as a patty, still served with ranch and crispy greens, but also with a delicious toasted bun!?! And it was so. I tweaked the general recipe some, adjusted the buffalo sauce proportions, and improvised my own “ranch” dressing (quotes because I’m not sure if it’s real ranch without mayonnaise or buttermilk). These burgers turned out phenomenal- perfectly crisped edges, wonderfully buffalo-sauced, and cooled just a touch by the ranch on top. To be honest, while I ate these all week simply with sauce and arugula, my favorite serving style was with a buttered, toasted bun and a runny egg on top. But, in all fairness, that’s always the best way to serve anything.

These are a great spin on a classic weeknight meal, and, I think, tastier than buffalo chicken. The quinoa just absorbs the flavor better. Top as you like, always with a fresh roll (toasted).

Processed with VSCOcam with f2 preset

Processed with VSCOcam with f2 preset

Buffalo Quinoa Burgers

Based off of this recipe

Serves 6

Homemade buffalo sauce

  • 1/3 cup hot sauce of choice (I’ve used Frank’s and Cholula)
  • 2 tbsp. butter, melted
  • 2 tbsp. extra-virgin olive oil
  • 1/2 tsp. garlic powder
  • 1/2 tsp. onion powder
  • 1/4 tsp. cayenne
  • Dash of red chili flake

Quinoa burgers

  • 2 cups cooked quinoa
  • 1/2 cup panko bread crumbs
  • 1 cup cannellini (or other white) beans
  • 1 egg
  • 1/4 cup homemade buffalo sauce

Homemade ranch dressing

  • 1/2 cup greek yogurt
  • 1 tbsp. lemon juice (about 1/2 a lemon, squeezed)
  • 1/4 cup milk
  • 1 tbsp. extra-virgin olive oil
  • 3 cloves garlic, minced
  • 1 tsp. Italian seasoning (or a mixture of dried thyme, oregano, and parsley)
  • 1/2 tsp. salt

2 tbsp. olive oil

Soft, fluffy buns

Arugula or other greens to serve

To prepare the ranch dressing, add all ingredients to a blender, mason jar, or bowl. Blend, shake, or whisk accordingly until all ingredients are combined. Place in the refrigerator to cool until ready to use.

To prepare the buffalo sauce, melt butter in a large bowl. Whisk together with extra virgin olive oil. Whisk in the hot sauce and spices. Set aside for later use.

To prepare the buffalo quinoa burgers, first prepare 2 cups of cooked quinoa. To make approximately 2 cups of cooked quinoa, heat 1 cup of water to boiling in a medium pot. Add 1/2 cup of dried quinoa to the boiling water, reduce the heat to low, cover the pot, and simmer. Simmer quinoa for 10-15 minutes until opened and soft.

In a large bowl, mix the two cups of quinoa with 1/2 cup panko bread crumbs. In a food processor, blend the cannellini beans to a puree. Add the pureed beans to the bowl with the bread crumbs and quinoa. Add the egg, whisked, and 1/4 cup of the prepared buffalo sauce. Stir thoroughly to combine until the mixture is wet but firms into clumps in your hand (think hamburger patty consistency). Add more bread crumbs or buffalo sauce as needed to get it right.

In order to make the 6 patties, I try to level the quinoa mixture in the bowl with a spoon. Score the mixture with the spoon down the middle, then score 3 lines perpendicular to the first. Grab the scored area to form the patties.

Heat olive oil in a large sauté pan over medium heat. Add the buffalo quinoa patties and cook for 5 minutes per side, covering the pan (except to flip). Remove from the pan and place on a cooling rack. Drizzle the remaining prepared buffalo sauce over the patties. The buffalo quinoa patties will easily keep in the refrigerator for 1 week. Alternatively, you could cool the patties then freeze.

To prepare your burger, toast the buns in butter on a sauté pan (or toast then butter). Add your buffalo quinoa patty and top with a good spoonful of ranch dressing and your greens. If you want to throw a fried, over-easy egg on there, I’ll applaud you for your good taste.

Processed with VSCOcam with f2 preset

Look at that egg, the yolk begging to drip all over the burger, the plate, and your face. If you like buffalo-style anything, I promise you’ll love these. And better, you can enjoy them all week… or anytime, really.


Greens, Eggs, and Pan

This may be my favorite savory breakfast, save the more indulgent rare quiches and restaurant-finds, and it’s one of my go-to “I don’t have anything for dinner” meals. I can’t count the number of times I topped toast and greens with eggs and called it dinner while in graduate school, starving mid-study session and short on the patience required to prepare a more “substantial” meal. But what’s odd is now I find myself craving it, kind of in the way breakfast for dinner or cereal nights are sometimes preferable to mindfully prepared dinners. And, beyond that, with the right bread, and the right greens, these ingredients genuinely blend perfectly together, the yolk coating the somewhat bitter greens and enhancing the buttered, yeasty bread below. So you’ll need to excuse my Dr. Seuss pun (it was too easy), as this is not some distasteful dish to run away from, but rather a delicious escape from time-intensive meals. And for anyone wondering, pan means bread in Spanish, and it was the only way to make this rhyme work.

I know some are wary of a runny yolk, but I have to insist you give it a try. I owe my own experience to my best friend and former roommate, who introduced me to the bread-in-drippy-yolk combo, which absolutely blew my mind.* There are eggs, scrambled or otherwise, on a whole spectrum of deliciousness. But an egg over easy, yolk loose and sauce-like, is just second to none. But, if you’re a first-timer, over medium may be a safe place to start. You’ll get a little runny yolk action, but mostly have a pretty firm egg. Just… don’t go straight for the scramble. So many lost eggs out there.

Processed with VSCOcam with f2 preset

Processed with VSCOcam with f2 preset

Processed with VSCOcam with f2 preset

Processed with VSCOcam with f2 preset

Toasted Bread and Greens with Eggs Over-Easy

Serves 1

2 slices good bread (I used half of a demi-baguette, but sourdough or a seedy wheat would also be excellent)

1 tbsp. butter, divided

2 cups arugula or other green (spinach or a delicate spring mix work nicely)

2 large brown eggs (organic, free range preferably)

In a small sauté pan, melt 2 tsp. butter over medium heat in the shape of your bread slices. Place the bread flat-side down onto the pan, pressing firmly to coat the bread with melted butter. Heat the bread until toasted and just browning in butter, then remove from heat. Alternatively, if your bread is fresh and soft and perfect, just spread 1 tsp. softened butter on each slice.

Top the bread, toasted or otherwise, with the greens.

In the previously used sauté pan, melt the final teaspoon of butter over medium-low heat. Crack the eggs side by side into the pan, making sure to keep the yolk intact. Cook the eggs until the bottom of the egg-whites are set, about 2-3 minutes, then cover with a lid. Cook for an additional 2-3 minutes, until whites are fully set but the yolk is still runny (it should move loosely when you go to move the eggs with a spatula). If a more set yolk is desired, cook for a few more minutes covered, until the thin layer of whites surrounding the yolk are more opaque, and the egg is less mobile.

Gently, with a spatula, top the greens and toast with the eggs. Use a fork to break the yolk and allow to run all over. Eat with a fork or with your hands, whichever is more feasible and more messy. It’s more enjoyable that way.

Processed with VSCOcam with f2 preset

Finish the meal with a beautiful blood orange on the side. Dinner and dessert now complete. You are free to go about your scheduled evening activities.

*Processed with VSCOcam with f2 preset

In tribute of the classic, buttered bagel dipped into 2 over easy yolks, whites scooped up with the bagel in hand. Also, this is a good example of a more “over-medium” egg.